Calibration 2 Axis – Toolkit
Applies to Legacy Versions 1060 & 1200
Not applicable to Series 2400
Standard Calibration is the simplest method of calibrating directly from tool kit.
This assumes that all Location (here) and both axis Motor set up has been completed, wiring is completed and you are ready to track the sun.
Tech Note:
If you want to use Auto Cal do not use this procedure otherwise make sure Auto Cal is not enabled. See registers ALT01_AUTO_CAL and AZI01_AUTO_CAL on the same tab.
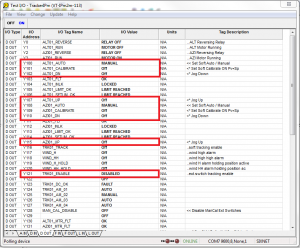
Select Tab D OUT
See Figure 7 below. In order to calibrate, the following registers should read; (Disregard I/O Tag Names beginning with AZI for Single Axis or Parabolic Trough)
- ALT01_AUTO MAN
- ALT01_CALIBRATE ON
- AZI01_AUTO MAN
- AZI01_CALIBRATE ON
- TRK01_TRACK ON
To change the the Auto/Manual & Calibrate registers, simply high light the register and toggle by clicking the OFF – ON at the top left of the pop-up.
To move the tracker to On-Sun, toggle the OFF – ON at the top left of the pop-up for these registers one axis at a time.
- ALT01_UP Moves the altitude drive towards the horizon 90 degrees*
- ALT01_DN Moves the altitude drive towards the zenith 0 degrees*
- AZI01_UP Moves the azimuth drive in the clockwise direction.
- AZI01_DN Moves the azimuth drive towards in the counter-clockwise direction.
It is best to calibrate one axis at a time and put it back into Auto immediately (the sun keeps moving). Make sure that the CALIBRATE register is turned off. You are now tracking.
TRK01_ENABLE must be on. This is set by a switch or jumper wire between terminal 5 and terminal 17. LED 9 with light when this circuit is complete.
Next Step: Auto Calibration